Pokazywanie postów oznaczonych etykietą 20's. Pokaż wszystkie posty
niedziela, 15 czerwca 2014
poniedziałek, 12 maja 2014
Greta Garbo Make Up
Witajcie! W dzisiejszym tutorialu pokażę Wam jak wykonać makijaż w stylu wspaniałej Grety Garbo. Nie jest to raczej makijaż na co dzień, ponieważ potrzebne tu będzie zakrycie naszych brwi, lekkie wymodelowanie oka oraz zmniejszenie ust ale przyda się przy sesji zdjęciowej lub imprezie tematycznej :)
-----------------------------------------------------------------------------------------------------------------------------------------
Hi! Today I'm going to show you amazing Greta Garbo's make up tutorial. It's rather not "everyday make up", because we need to cover our eyebrows, shape slightly our eyes and decrease lips but it may be useful for photoshoot or dressing up party :)
1. Firstly we need to cover eyebrows. I applied a few layers of concealer, foundation and transparent powder (you can also use non-toxic glue stick). Then cover the whole eyelid and inner eye with light beige eyeshadow.
1. Na początek musimy zakryć nasze brwi. Ja użyłam do tego kilku warstw korektora, podkładu i transparentnego pudru (można również zakryć je używając nietoksycznego kleju w sztyfcie). Gdy już to zrobimy na całą powiekę i na wewnętrzny kącik oka nakładamy bardzo jasny beżowy cień.
2. Szarym cieniem kreślimy łuk, który najwyższy swój punkt będzie miał przy wewnętrznym kąciku oka (chcemy wymodelować swoje oczy tak, by przypominały oczy Grety). Odrobinę szarości nakładamy również przy zewnętrznym kąciku.
3. Szary cień rozcieramy. Łuk, który nakreśliliśmy rozcieramy tylko i wyłącznie w górę!
4. Używając czarnego cienia rysujemy łuk w miejscu, w którym zrobiliśmy to używając szarości. Przy zewnętrznej stronie oka wyciągamy go w dół. Dodajemy również odrobinę cienia w zewnętrzny kącik.
5. Czarnym eyelinerem obrysowujemy oko dookoła. Na górnej powiece linia powinna być najgrubsza na mniej więcej środku oka, i stawać się coraz węższa, kiedy zbliżamy się do zewnętrznego kącika oka, gdzie powinna również prowadzić lekko w dół.
6. Rzęsy malujemy tuszem lub naklejamy sztuczne rzęsy. Jeżeli jest taka potrzeba staramy się jeszcze bardziej ukryć nasze brwi, a potem rysujemy nowe. Powinny być one bardzo cienkie i wysoko uniesione.
7. Usta zakrywamy używając podkładu oraz pudru i rysujemy nowe. Używając kredki nadajemy im ostry kształt, wyraźny i głęboki łuk kupidyna, oraz (jeżeli mamy pełne usta) staramy się je chociaż odrobinę zmniejszyć. Nakładamy szminkę w dowolnym odcieniu czerwieni.
Gotowe!
-----------------------------------------------------------------------------------------------------------------------------------------
Hi! Today I'm going to show you amazing Greta Garbo's make up tutorial. It's rather not "everyday make up", because we need to cover our eyebrows, shape slightly our eyes and decrease lips but it may be useful for photoshoot or dressing up party :)
1. Firstly we need to cover eyebrows. I applied a few layers of concealer, foundation and transparent powder (you can also use non-toxic glue stick). Then cover the whole eyelid and inner eye with light beige eyeshadow.
2. Using grey eyeshadow draw an arc, whose top will be around the inner eye (we want to get Greta's eyes effect). Apply a little bit grey eyeshadow around the exterior eye too.
3. Rub grey eyeshadow. Rub also an arc but only up above!
4. Draw another arc with black eyeshadow where the grey one is. Around the exterior part of the eye make it downwards and apply a trifle black eyeshadow on exterior eye.
5. Outline an eye with black eyeliner. On the upper lid the line should be the thickest in the middle and should be getting thinner towards the exterior eye around where it must go slightly downwards.
6. Use mascara or put on false eyelashes. Try to cover eyebrows once again if needed and than draw a new ones. They should be very thin and highly lifted .
7. Cover your lips using foundation and powder. Then draw new ones too. Using lip liner make them look sharp, definite and deep cupid bow. If you have full lips try to decrease them.
Done!
środa, 28 sierpnia 2013
Half moon manicure
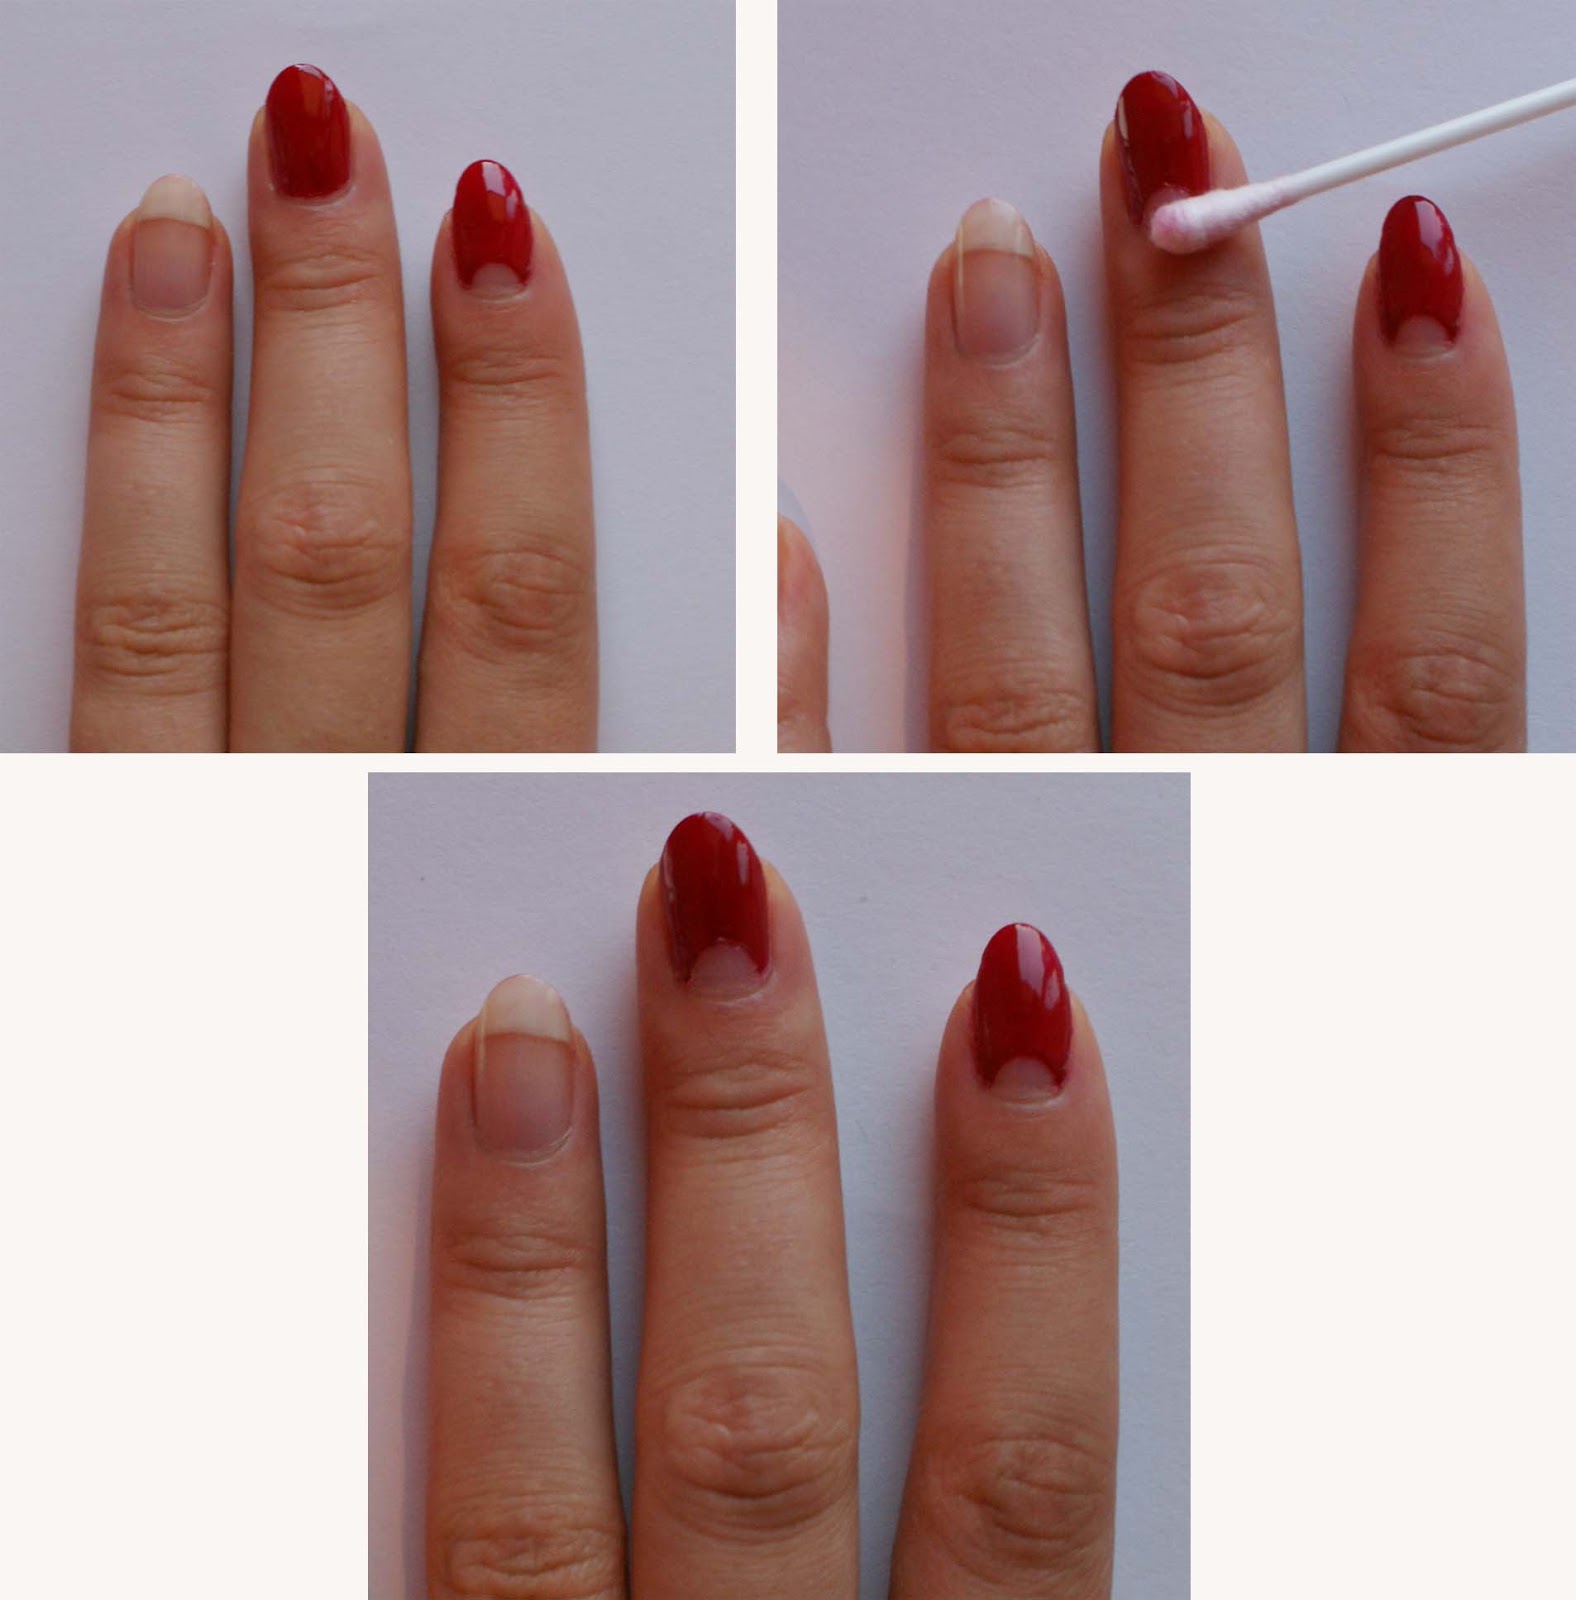
Half moon manicure swoją popularność zdobył w latach 20. Jest bardzo elegancki i prosty w wykonaniu. Istnieje kilka wersji tego manicure: taki gdzie łuk u nasady i na końcówce paznokcia są pomalowane na biało, taki gdzie wypełniony bielą jest tylko łuk u nasady lub taki gdzie łuk u nasady paznokcia zostaje pusty.
Jako, że jest to mój ulubiony manicure chciałabym przedstawić dwa proste sposoby na stworzenie jego najprostszej wersji.
Sposób I
1. Pomaluj paznokcie bezbarwną odżywką.
2. Używając cienkiego pędzelka, czerwonym lakierem namaluj łuk u nasady paznokcia.
3. Tym samym kolorem (używając normalnego pędzelka) pomaluj paznokieć pomijając zaznaczone wcześniej łukiem miejsce.
4. Po upewnieniu się, że lakier jest już suchy, pokryj paznokieć utwardzaczem lub bezbarwnym lakierem.
Sposób II
1. Pomaluj paznokcie bezbarwną odżywką.
2. Cały paznokieć pomaluj czerwonym lakierem i odczekaj około 15 sekund.
3. Używając nasączonego zmywaczem patyczka zmyj lakier, tak by otrzymać kształt łuku.
4. Gdy lakier wyschnie pokryj go utwardzaczem lub bezbarwnym lakierem.
--------------------------------------------------------------------------------------------------
Half moon manicure gained its popularity in 20's. It's very elegant and also easy to make. There are at least three options of that manicure: one with the arcs on the bottom and on the tip of the nail coloured with white nail polish, another one with the arc filled with white nail polish and the last one where varnish is not used at all.
As the half moon manicure is my favourite one, I'd like to present two simple ways of how to create the easiest of the options.
Instruction number I
1. Use colourless nutrient to protect your nails.
2. Using thin brush and nail polish, draw a red arc at the bottom.
3. Colour the nail with red nail polish (with standard brush) avoiding previously drawn space below the arc.
4. Making sure that your nails are dry, cover them with colourless nail polish or stiffener.
2. Using thin brush and nail polish, draw a red arc at the bottom.
3. Colour the nail with red nail polish (with standard brush) avoiding previously drawn space below the arc.
4. Making sure that your nails are dry, cover them with colourless nail polish or stiffener.
Instruction number II
1. Use colourless nutrient to protect your nails.
2. Colour your nails with red nail polish and wait for 15 seconds.
3. Using cotton bud moistened with nail-varnish remover, wash away nail polish to get the shape of an arc.
4. Making sure that your nails are dry, cover them with colourless nail polish or stiffener.
3. Using cotton bud moistened with nail-varnish remover, wash away nail polish to get the shape of an arc.
4. Making sure that your nails are dry, cover them with colourless nail polish or stiffener.
Subskrybuj:
Posty (Atom)